- You are here:
- Home »
- Tips Tricks and How To »
- How-to Polish Airbrush Needles
How-to Polish Airbrush Needles
If you polish airbrush needles the world will be yours. Smooth, polished needles don’t let paint easily stick to them. Pointy, sharpened needles let you paint finer details.
Have you heard the siren’s call? Do you want a Polished Airbrush Needle Power-Up for your beloved airbrush?
These claims do have some truth to them.
- A sharper needle will, in fact, allow finer details.
- A smoother needle will, in fact, acquire less tip-dry. (paint stuck to the needle’s tip while spraying)
But let me bring more reality to this discussion.
All The Reasons Why You Shouldn’t Do It
-
Weigh the actual gain against the potential risk.
The actual gain is tiny compared to the potential to ruin your equipment and hurt yourself.
-
Needles are sharp, they hurt going in, they hurt coming out.
Your fingers will be very near the business end of a very sharp needle. Though I’ve never hurt myself, the potential is always there.
-
You can ruin your needle.
I don’t mind people who tinker and modify their equipment, in fact I think they’re kind’ve fun. They like to know what’s going on, how things work. That’s great.
I do mind tinkerers who don’t take personal responsibility for their tinkering. So let’s state, up front, who’s at fault if something goes wrong here.
You’re at fault.
- Not me
- Not the airbrush manufacturer
- Not the retailer who sold it to you
- Not the shipping company who shipped it to you
- Not a militant terrorist group sabotaging your equipment.
- Not your Aunt’s yippie dog…well, maybe I’ll let you blame it on the yippie dog–they take power tools to a whole new level…
Take personal and financial responsibility for your modding habit. Think of it as tuition for learning your crazy mad modding skillz.
-
In my opinion most people don’t need to polish their needles.
Most manufacturers already polish airbrush needles to some degree.
-
If you’re new to airbrushing, go practice.
If just started spraying this is not a technique for you. Practice will significantly improve your abilities in all areas far quicker, and far more extensively than polishing a needle or modifying your airbrush.
You still with me after all that? You’ve decided you’d still like to try this?
Okay, let’s get down to it.
Safety Equipment
Be smart. I write these warnings for your health not mine, I already know and do these things.
- Wear safety glassesMetal shavings or a broken needle and eyes don’t go together well…
- Wear leather glovesGloves won’t stop the worst things that can happen–like the needle point sticking you, but they stop most things short of that.
Stuff You’ll Need
- wet/dry sandpaper: start at 1000 grit, use finer paper as needed
- water
- drill
How To Do It
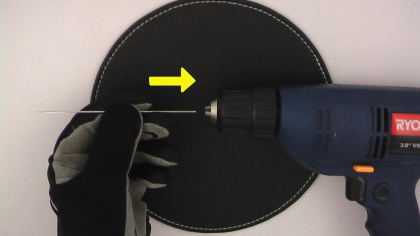
- Insert the butt end of the needle into the drill chuck

- Tighten drill chuck

- Wet the sandpaper
- Spin the needle up to a constant speed

- Press the needle tip onto the wet sandpaper

Please ignore the graph paper. I don’t actually need, nor do I want to polish my airbrush needles. - Maintain constant speed on the drill
- Move the needle to a new area as you wear off the grit
- Keep buffing until the needle is sufficiently polished
- Repeat the procedure with a finer grit sandpaper until you reach the desired level of polishy, shiny, goodness.
Tips and Things to Keep in Mind
- Polishing compound is an optionMake sure the compound doesn’t leave any residue. Left over residue can cause paint problems later on.
- The rougher the needle, or the pointier you want to make it, the rougher the sandpaper you should start with.
- Only polish the needle’s tip.
 Don’t bother with the needle’s shaft, in fact, avoid sanding the rest of the needle. There’s a seal between the paint system and the trigger housing. If the needle’s too small you won’t have a seal.
 - Polish the whole tip.Though only the very tip of the needle’s tip will actually deal with tip-dry, you are removing material from the needle. Do this wrong and it won’t seat against the inside of the nozzle. In other words, polish the entire needle tip.
- Try not to bend the needle.I know it’s metal, I know it bends quite a bit. If the needle snaps a quickly spinning, possibly sharp object is aiming for the back of your hand.
- How shiny do you want the needle?Remember shiny only helps with tip dry. There’s quickly diminishing returns the more time and money you put into this, but you can go up to 8000 grit sandpaper if you want a mirror finish.
- Pointier needles tend to stick out further.Pointy is great for better detail but if the needle sticks out past the needle cap it’s more prone to getting dinged or bent while you make those fine details.
- Longer needles allow more tip-dry.
